
You don’t need to turn your kitchen into a haunted house to make it feel spooky-chic. A few clever swaps, some dramatic lighting, and a touch of “did I just see that move?” magic will do the trick. Let’s brew up a kitchen that’s festive, functional, and low-key fabulous.
1. Cast A Spell With Moody Lighting
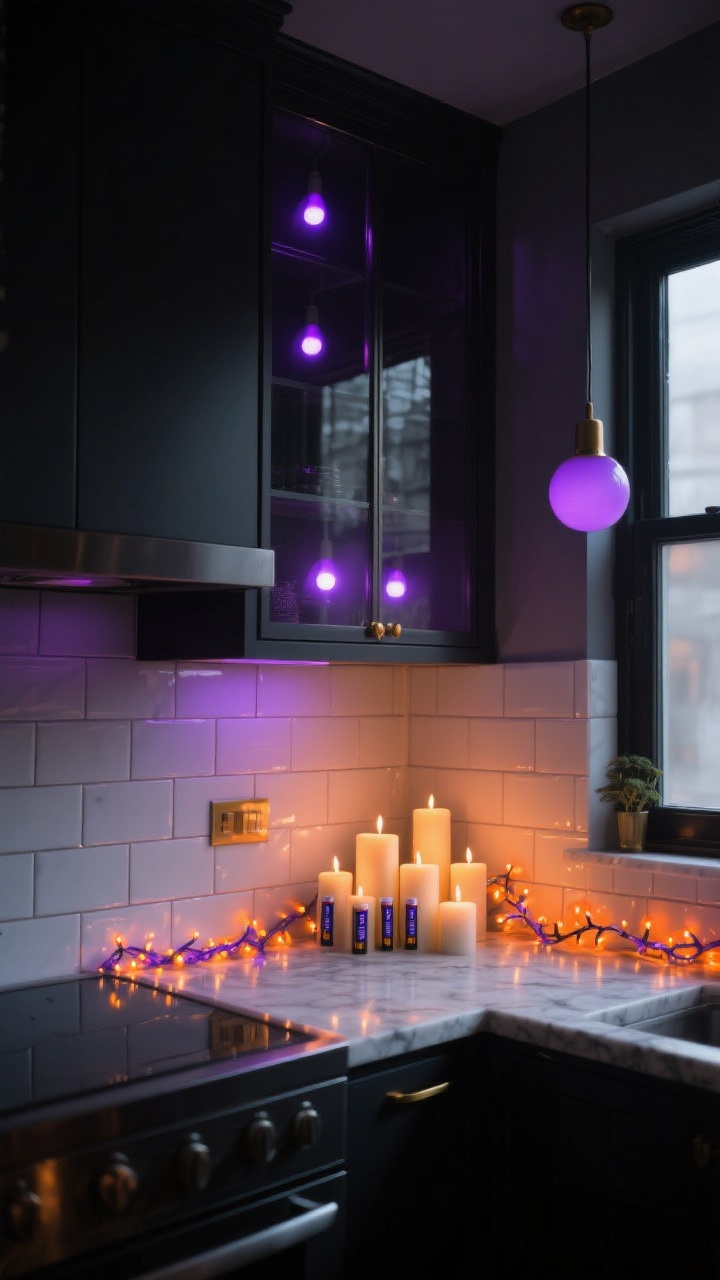
Lighting is your Halloween MVP. Swap bright overheads for warm, dim glows and let the shadows do their spooky thing. Think flickering vibes, not interrogation room.
Go For Atmosphere, Not Glare
- Battery candles on the counter, windowsill, or open shelves = instant haunted ambiance.
- Add orange or purple fairy lights along the backsplash or inside glass-front cabinets.
- Use smart bulbs to set a “Potion Lab” scene with warm amber or deep violet.
FYI: Lighting is where your kitchen goes from “cute pumpkins” to “witches definitely cook here.”
2. Style A Bewitching Coffee (Or Potion) Station

Turn your everyday coffee corner into a mini apothecary. It’s an easy area to decorate and gets used constantly—so it’ll actually be seen.
Apothecary Details That Slap
- Decant coffee, tea, and sugar into labeled glass jars with vintage-style tags: “Witch’s Brew,” “Bat Wings,” “Ghoul Sugar.”
- Layer a black lace runner or a small plaid napkin under your mugs for texture.
- Swap in Halloween mugs and add black-and-white paper straws in a skeleton-hand cup.
- Perch a small raven or crow figurine on the shelf for a “he’s watching” moment.
Pro tip: Keep it functional. Cute labels are great, but make sure you can still tell which jar is decaf. Your 10 p.m. self will thank you.
3. Dress Your Surfaces: Runners, Towels, And Layered Textures

Soft goods are the easiest way to shift the vibe without going full kitsch. Plus, they hide the crumbs you swear you didn’t just see.
Texture = Instant Upgrade
- Lay a black gauze runner across the island or console for elegant decay.
- Mix tea-stained linens, plaid napkins, and burlap for a rustic haunted look.
- Swap in Halloween dish towels—think subtle prints: moons, stars, tiny skulls.
- Use mini rugs in burnt orange or charcoal by the sink to anchor the space.
Keep patterns coordinated: two prints max. Stripes + bats? Cute. Skulls + pumpkins + plaid + webs? Chaos gremlin energy.
4. Curate Creepy-Cute Countertop Vignettes
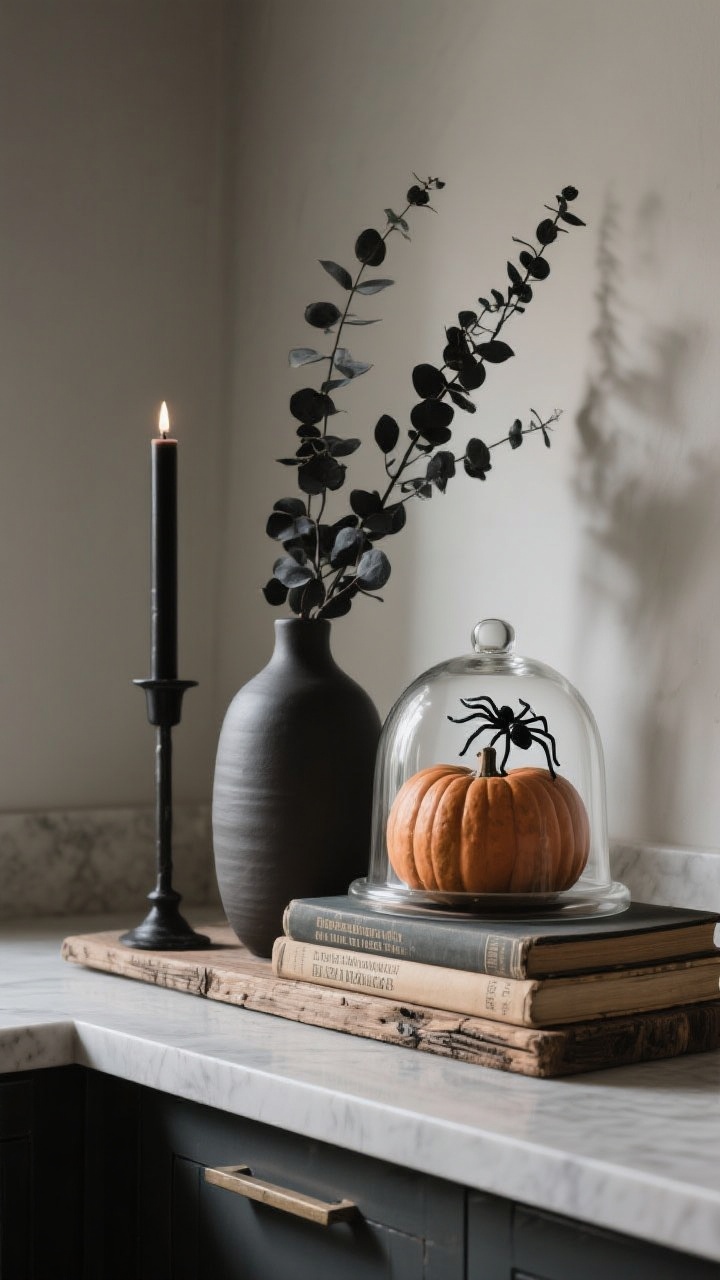
Instead of scattering decor everywhere, create tight, styled moments. They look intentional and won’t steal your prep space.
Three-Piece Formula That Always Works
- Height: A taper candle, witch hat, or tall floral stems (dried black eucalyptus is chef’s kiss).
- Shape: A pumpkin, cloche, or skull to ground the scene.
- Texture: A wood board, woven tray, or lace doily for contrast.
Try a glass cloche over a plastic spider on a stack of vintage cookbooks. It’s giving museum of the macabre—without the dust.
5. Open Shelves, But Make Them Haunted
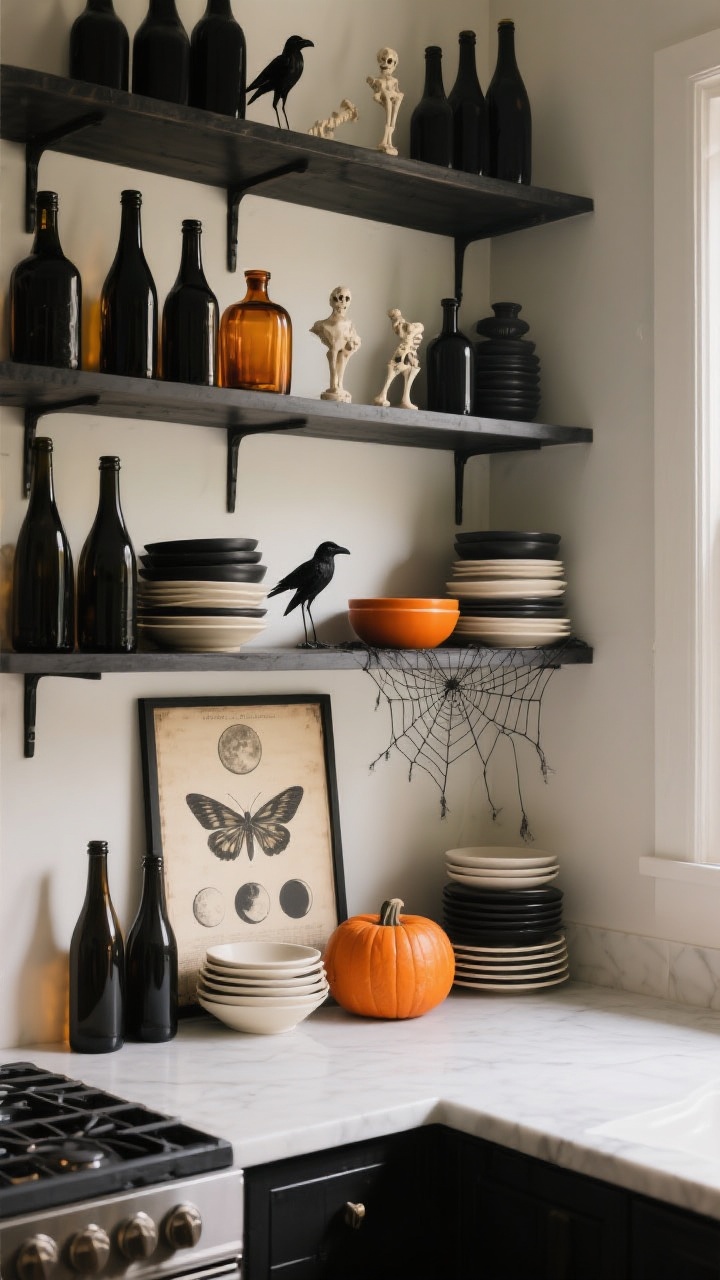
If you’ve got open shelving, this is your main stage. Keep it edited so it still looks like a kitchen, not a party store exploded.
Arrange Like A Stylist
- Swap in black or amber glass bottles and tuck in a few bone or crow figurines.
- Stack charcoal and cream dishes with a pop of pumpkin orange for balance.
- Lean a small vintage-inspired print (moths, moon phases, botanical “poisons”).
- Drape a tiny faux web on one shelf—restraint is key here.
IMO, a simple color palette—black, cream, and one accent (orange, green, or plum)—keeps it classy, not campy.
6. Set A Witchy Table (Even If You Don’t Sit There)
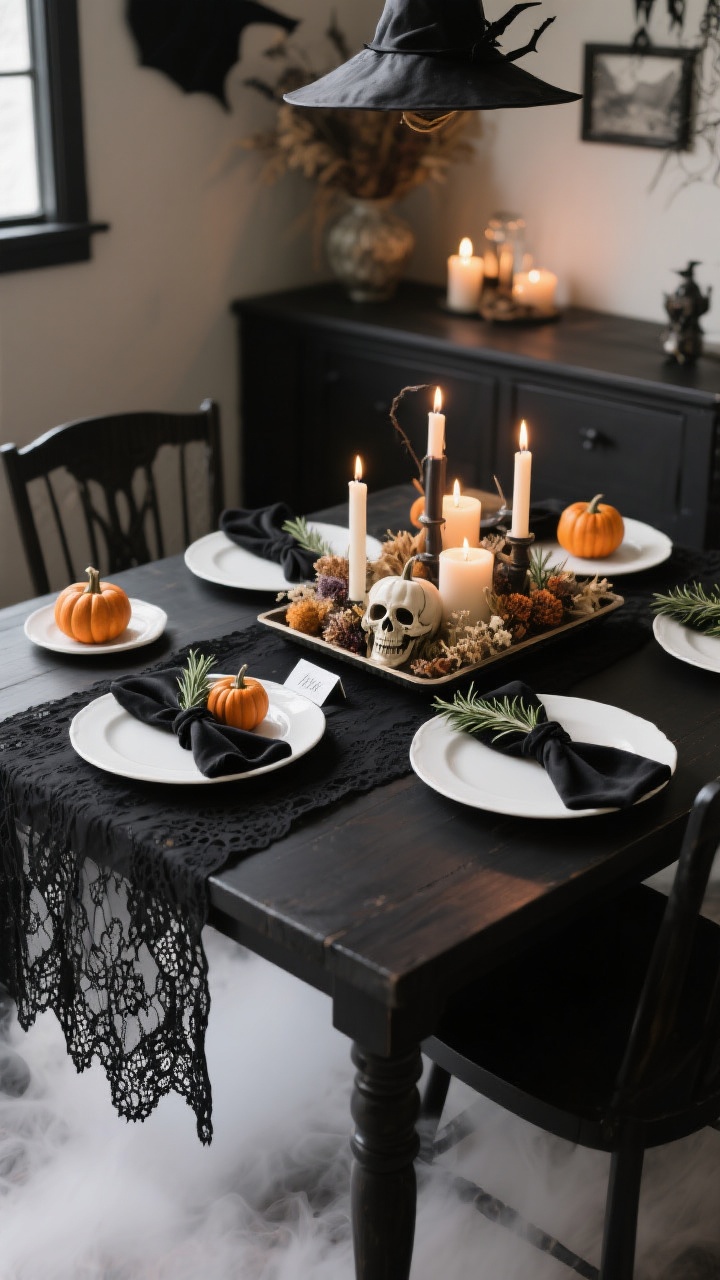
Your dining nook or breakfast bar is prime real estate. Dress it once and you’ve got instant mood for weeks.
Layered Tablescape Basics
- Start with a table runner in black, rust, or deep green. Add a second layer in lace or gauze for dimension.
- Use chargers (black or wood) under white plates, then top with mini pumpkins or a place card skull.
- Centerpiece: A low tray with mixed candles, dried florals, and a ceramic pumpkin. Keep it low so you can still talk over it.
- Tie black velvet ribbons around napkins; tuck in a sprig of rosemary for that “witch’s herb garden” vibe.
Bonus: Slide in a fog machine under the table for party nights. It’s theatrical, but, like, in a cool way.
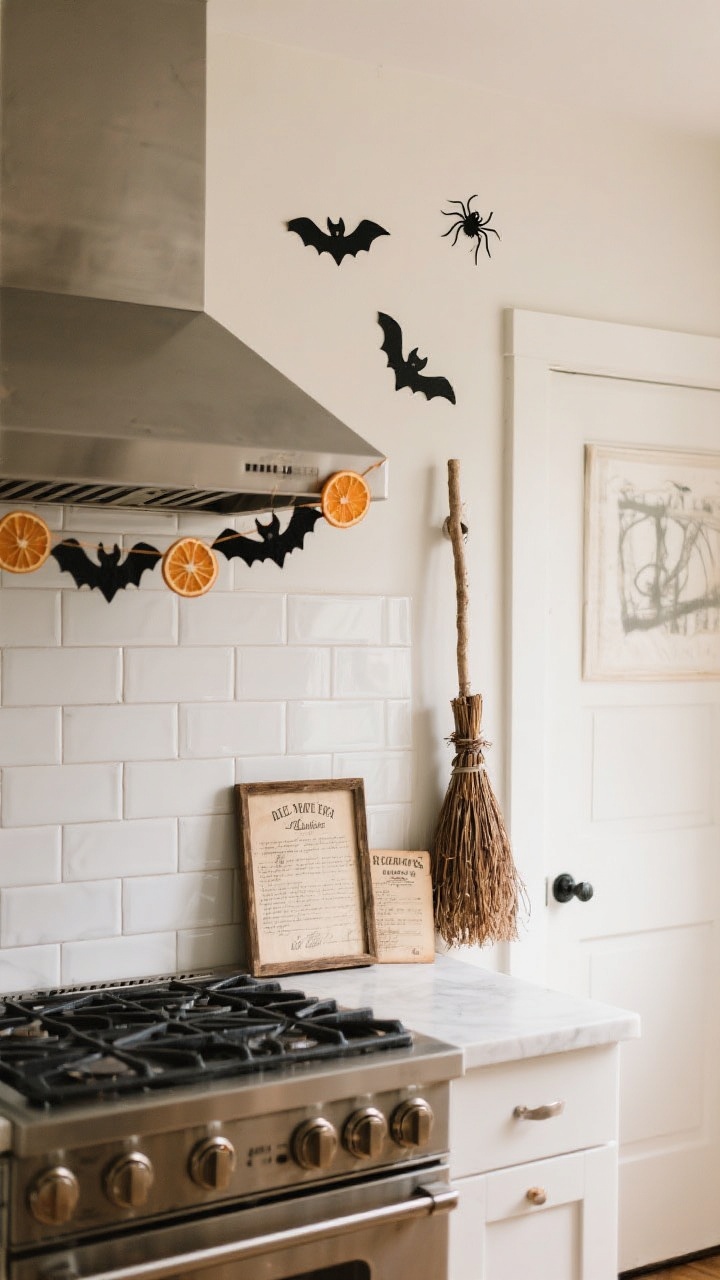
7. Turn Your Backsplash Into A Mini Haunt
Decorating the vertical space instantly changes the room without eating up counters. Also, it’s renter-friendly if you do it right.
Stick, Drape, Or Frame
- Use removable decals (bats, stars, or tiny spider silhouettes) that swoop from one corner.
- Drape a garland of felt bats, dried orange slices, or black paper moons along the hood or shelves.
- Frame a printable spell sheet or vintage recipe card and lean it against the tile.
- Hang a broom (yes, really) as wall art near the door—instant witchcore.
Keep the area behind the stove practical. Heat + paper garland = fire you did not plan for.
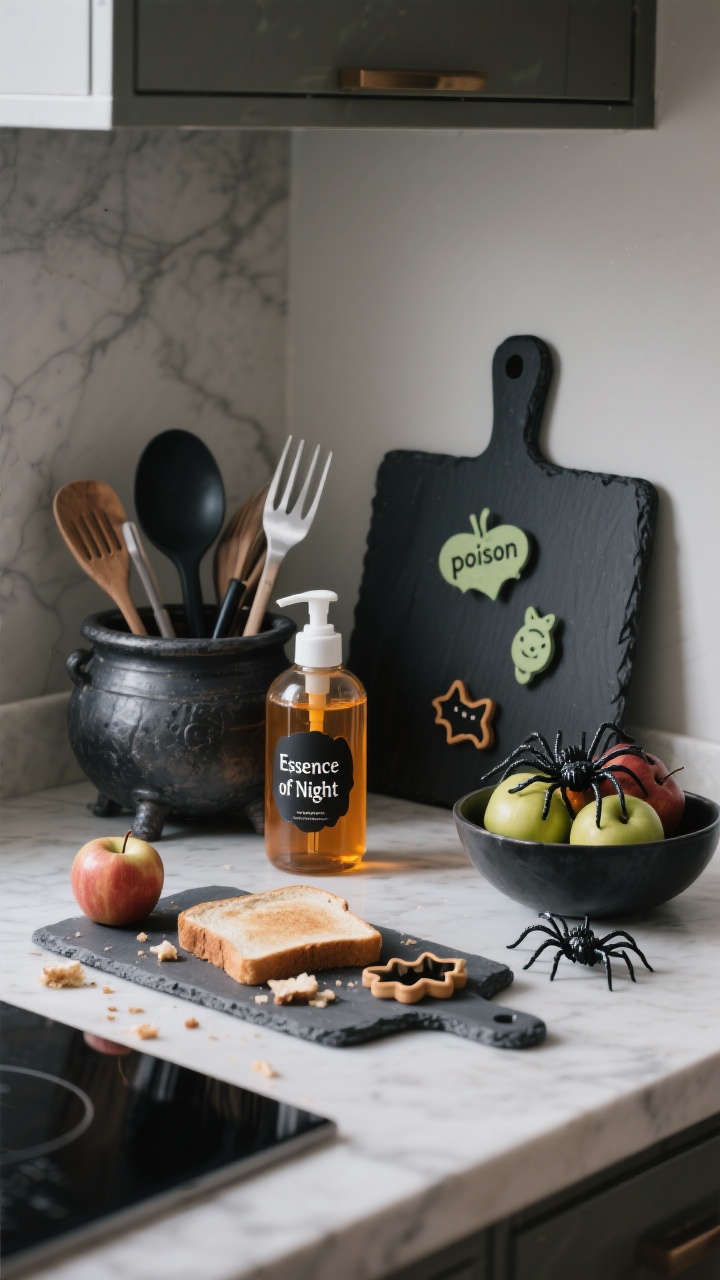
8. Add Subtle Spooks To Everyday Essentials
The best Halloween decor is the stuff you actually use. Think small, clever swaps that make you grin every time you reach for something.
Functional, But Make It Festive
- Pour dish soap into an amber glass bottle with a vintage label: “Essence of Night.”
- Store utensils in a cauldron-style crock or black ceramic pitcher.
- Swap your cutting board for a black slate board—great for cheese and “poison” apples too.
- Use cookie cutters (bats, cats, pumpkins) as napkin weights or to cut toast for brunch.
- Toss a handful of plastic spiders into your fruit bowl. Harmless jump scare = seasonal joy.
Remember: Less clutter, more character. Keep your counters clear and your spooky moments intentional.
Quick Color Palettes That Always Work
- Classic: Black, white, orange
- Moody: Charcoal, plum, antique gold
- Natural: Olive, rust, cream, wood tones
Pro tip: Choose one palette and stick to it across textiles, candles, and ceramics. It makes everything look expensive—even when it’s not.
Budget-Friendly Decor Hacks
- Thrift store magic: Grab brass candlesticks, dark books, and amber glass for pennies.
- Printable labels: Free vintage-style apothecary labels + cheap jars = instant potion shelf.
- DIY black florals: Spray-paint dollar-store faux flowers matte black for dramatic stems.
- Dried citrus garland: Slice oranges, bake low and slow, string with twine. Witchy, fragrant, adorable.
Safety And Sanity Checks
- Keep open flames away from curtains, paper, and wooden utensils. Battery candles look just as good.
- Don’t block prep zones—leave one clear stretch of counter for actual cooking.
- Use command hooks and putty for renter-friendly, drama-free removal.
There you have it: a Halloween kitchen that feels curated, cohesive, and totally you. Start with lighting, pick a palette, and build from there. With a few smart swaps and a dash of spooky flair, your kitchen will be the kind of haunt friends “accidentally” drop by to see—again and again. Now go stir the cauldron (aka that cinnamon-y pot of cider) and let the magic happen.