
Ready to turn your front yard into the spooky star of the neighborhood? Same. Let’s talk outdoor Halloween decor that’s bold, clever, and easy enough to pull off before the candy runs out. We’re mixing eerie vibes with stylish details, because your porch deserves more than a sad plastic pumpkin.
1. Graveyard Glam: Build A Chic DIY Cemetery
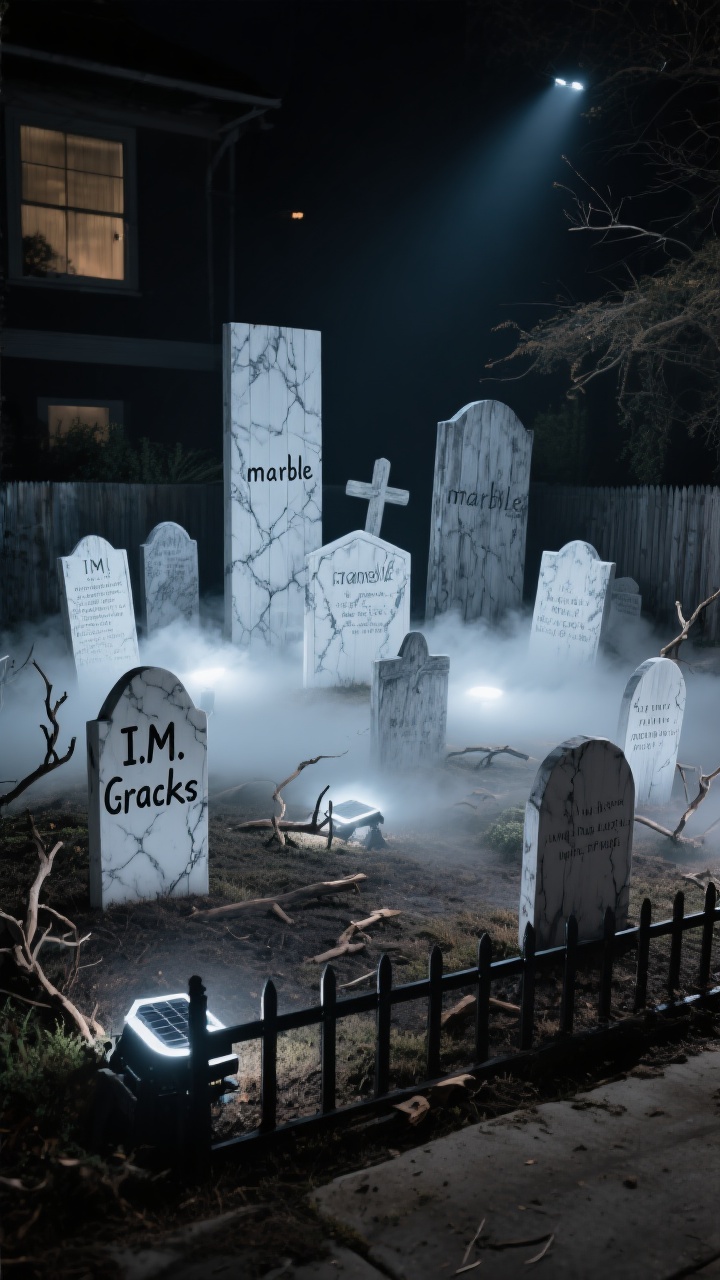
Forget flimsy foam tombstones that topple at the first breeze. Create a mini graveyard that looks stylishly decayed—like your yard has a storyline. Think layered tombstones, creeping fog, and moody lighting. Instant curb-appeal drama.
How to Style It
- Mix tombstone sizes: Use a few tall “marble” ones (painted wood or foam) in back and smaller ones up front for depth.
- Age them: Dry-brush with gray/white paint, add cracks with a sharpie, then dust with garden soil for a “centuries-old” patina.
- Add fog: A low-lying fog machine tucked behind stones = spooky cinematic vibes.
- Ground it: Stake everything. Wind is not your friend.
Pro Tips
- Letter tombstones with cheeky names—“I.M. Gone” never gets old, IMO.
- Edge the graveyard with low black fencing or broken branches for a haunted cemetery border.
- Use solar spotlights with cool-white bulbs to create ghostly highlights without cords.
2. Wicked Window Scenes: Make Your House Look Haunted From Within
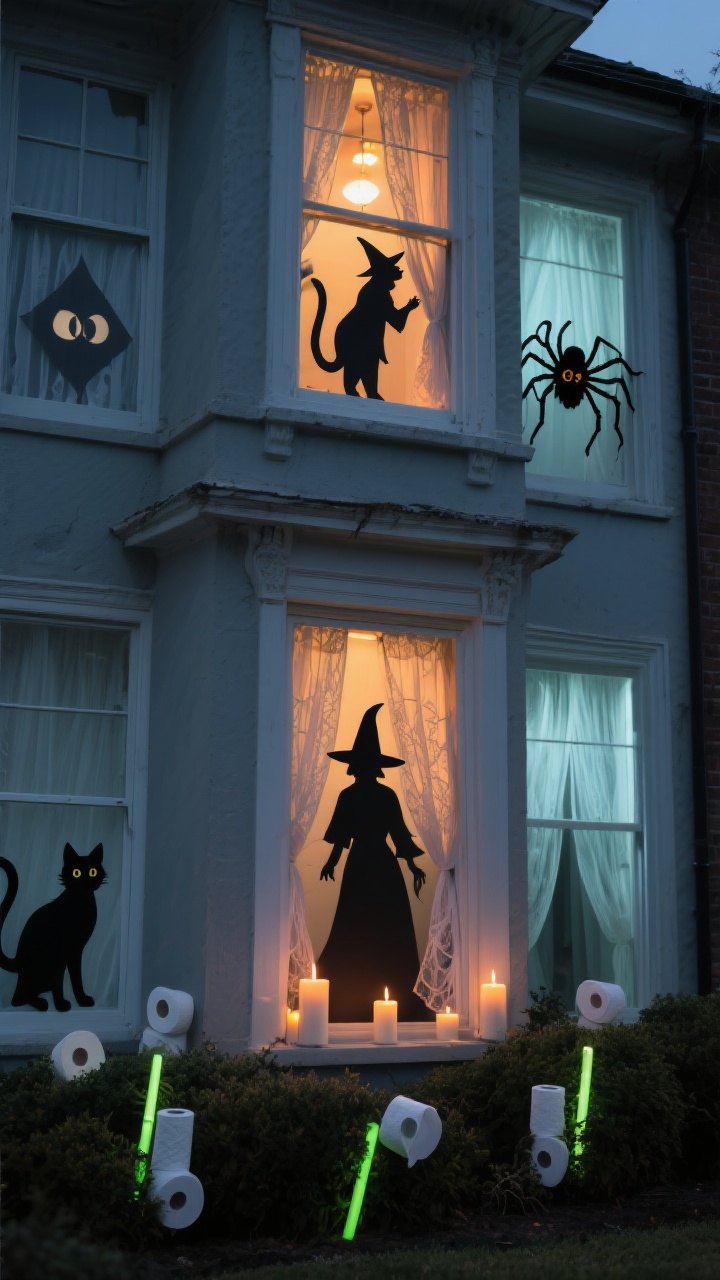
Windows are prime real estate for drama. Silhouettes, glowing eyes, and flickering light can make your house look convincingly haunted—without buying a single life-sized animatronic (unless you want to, of course).
What To Use
- Black paper silhouettes: Witches, cats, spiders—cut and tape inside. Backlight with warm lamps for that vintage haunted house glow.
- LED candles: Set them on windowsills for a safe, flickery effect.
- Glowing eyes: Cut toilet paper roll “eyes,” add glow sticks, and place in bushes for a spooky stare-down.
Pro Tips
- Layer cheesecloth or sheer curtains for a ghostly veil. It diffuses the light beautifully.
- Alternate warm and cool lighting for depth—FYI, cool white reads eerier on camera.
- Choose one “hero” window with a big scene and keep the rest minimal so it doesn’t look chaotic.
3. Statement Porch: The Dramatic Entry Everyone Photographs
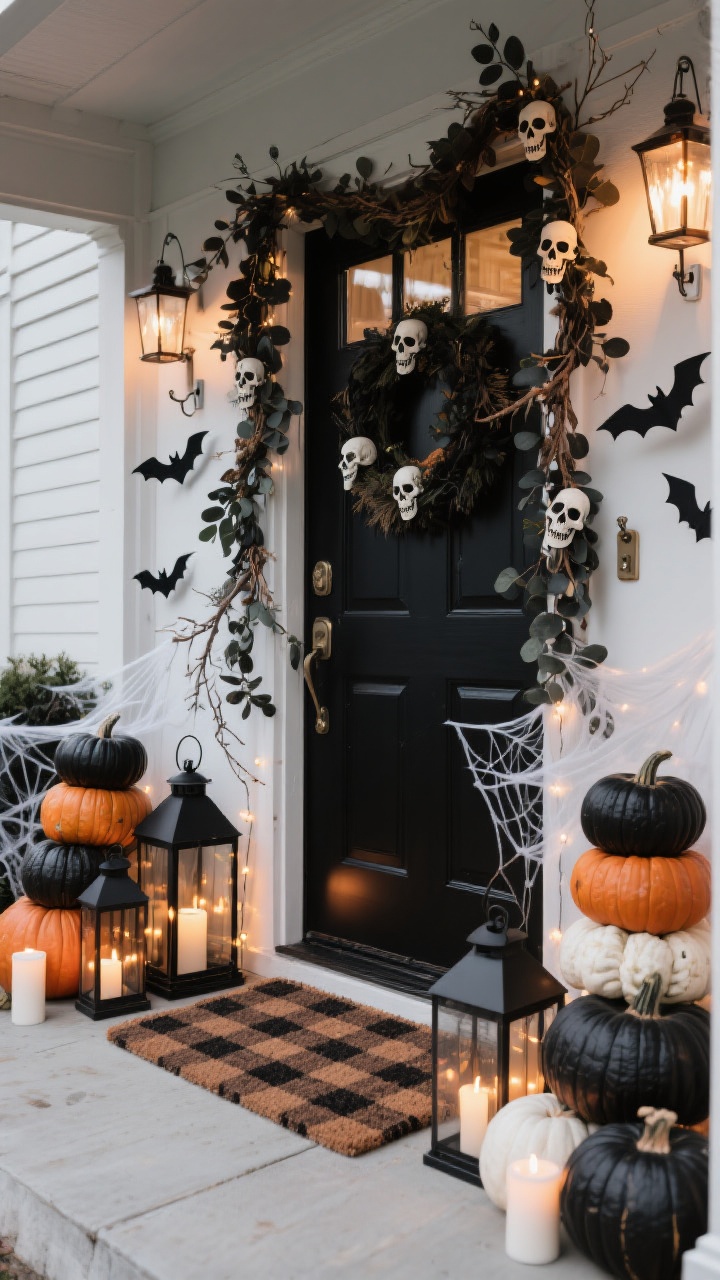
Your porch is the stage. Go big with garlands, lanterns, and a moody color palette that screams “I planned this.” Because you did. The goal: a dramatic doorway that nails spooky-chic.
Build The Look
- Layered doormats: Start with a plaid or striped rug under a Halloween mat for instant texture.
- Lantern cluster: Mix heights and fill with LED candles or fairy lights. Add faux cobwebs sparingly (less is more).
- Door garland: Wrap your frame with black eucalyptus, dried branches, and mini skulls. Add bats that “fly” outward.
- Pumpkin stack: Real or faux, stack them in odd numbers. Paint a few matte black or bone white for contrast.
Pro Tips
- Use command hooks to anchor garland and bats—no drama when the wind picks up.
- Spritz faux foliage with matte black spray paint for an instant gothic upgrade.
- Set a motion-activated sound near the doorbell. A raven caw never fails.
4. Cobweb Cathedral: Spin A Giant Web That Actually Looks Good

Spiderwebs can look messy fast. The trick is scale and structure. Build one dramatic, architectural web instead of draping webs everywhere. It reads intentional and spooky without the dust-bunny vibe.
How To Make A Hero Web
- Use rope or thick twine: Anchor to corners (roofline, railing, tree) to create a large radial web.
- Add cross-threads: Tie thinner twine across to form a true web pattern.
- Big spider: One giant spider = more impact than lots of tiny ones. Position it off-center, like it’s mid-sneak.
Pro Tips
- Highlight with a single spotlight angled low for dramatic shadows.
- Choose UV-reactive twine plus a blacklight flood if you want late-night glow.
- Keep walkways clear—no one wants to clothesline a guest. Safety first, spooks second.
5. Pumpkin Pathway: Glow-Up Your Walk With Sculptural Gourds
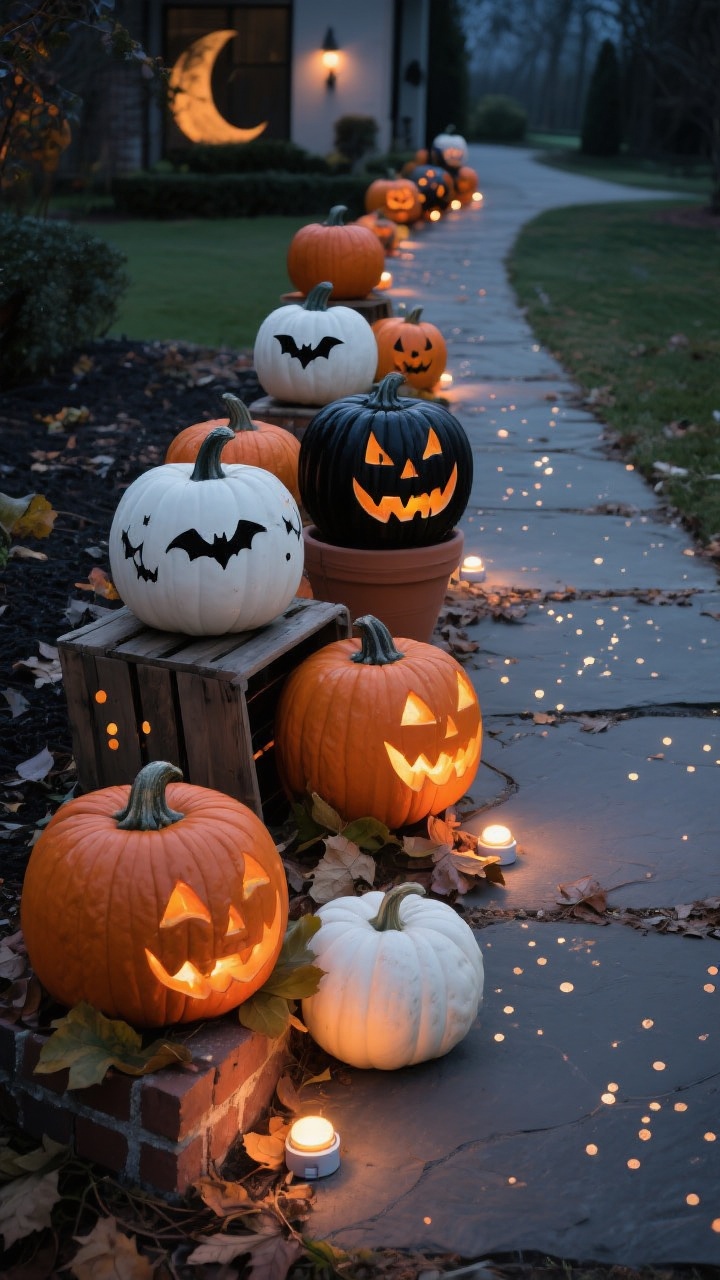
Is it even Halloween without pumpkins? A glowing pathway sets the mood, guides trick-or-treaters, and looks stunning on your Ring camera footage. Aim for variety to avoid that “grocery pile” look.
Design Like A Pro
- Mix textures: Real pumpkins + faux resin pumpkins + carved jack-o’-lanterns for personality.
- Cluster in threes: Vary heights with crates, upside-down pots, or bricks hidden under leaves.
- Light selectively: Not every pumpkin needs light. Alternate lit and unlit for rhythm.
Carving Alternatives
- Drill dot patterns: Use a drill to make starry constellations—super chic with warm LEDs inside.
- Painted faces: Matte black or bone white paint with simple graphic faces looks modern and weather-resistant.
- Silhouette decals: Bats, moons, or cats on white pumpkins are low-effort, high-impact.
Pro Tips
- Rub real pumpkins with petroleum jelly or a bleach-water spray to slow decay (FYI: test a small area first).
- Use battery puck lights with timers so they auto-on at dusk.
- Repeat the same color palette—orange, black, white—to keep it cohesive.
6. Haunted Trees And Bushes: Animate Your Landscaping
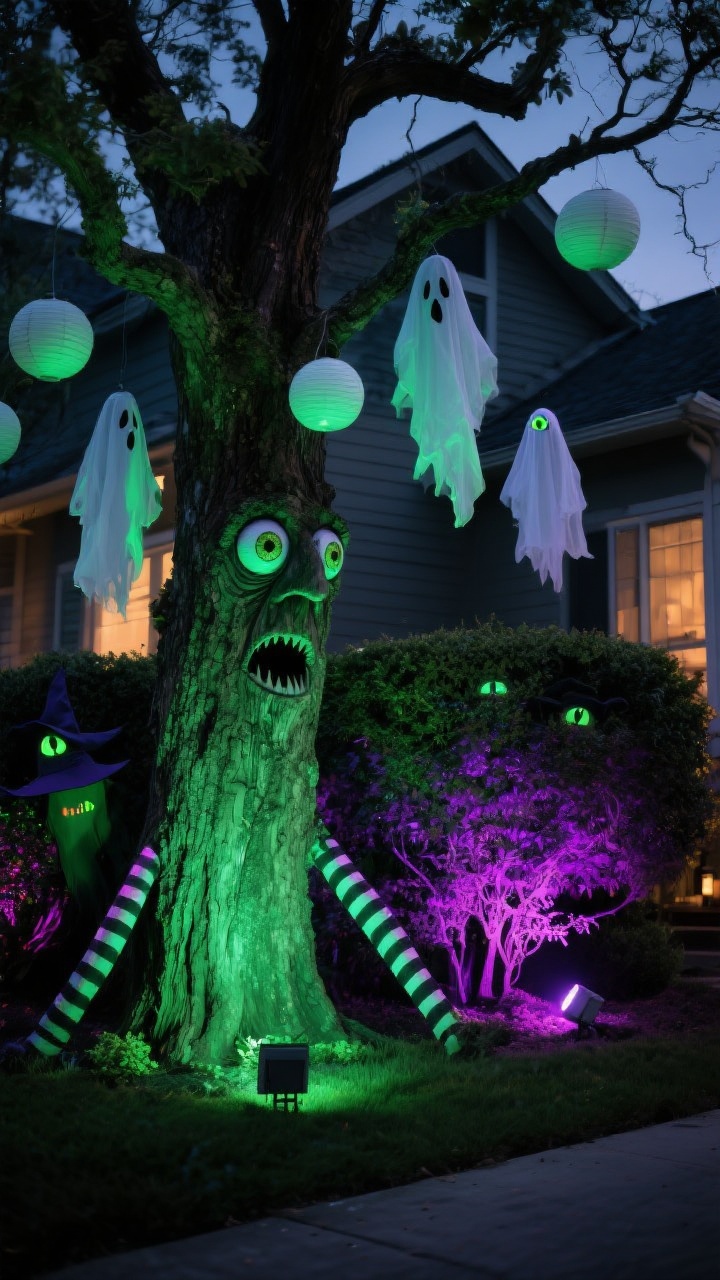
Turn your shrubs into characters and your trees into story elements. A few eyes, some lights, and texture make your landscaping feel alive—like, in a good, spooky way.
Ideas To Try
- Tree faces: Add resin eyes and mouths or DIY with foam. Spotlight from below for instant “haunted oak.”
- Hanging ghosts: Cheesecloth over foam balls or paper lanterns. Let them float at different heights.
- Bush eyes: Glow-stick or LED eyes peeking from hedges—kids will scream (and then laugh).
- Witch crash: A witch “crashed” into your tree with legs sticking out? Classic, hilarious, and very Instagrammable.
Lighting That Sells It
- Green for eerie, purple for mystical, amber for vintage: Pick one mood and stick to it.
- Uplights at the base of trees create long, creepy shadows on your facade.
- Use smart plugs or timers so everything turns on at dusk. Your future self will thank you.
7. Sound And Motion: The Finishing Touches That Make People Jump
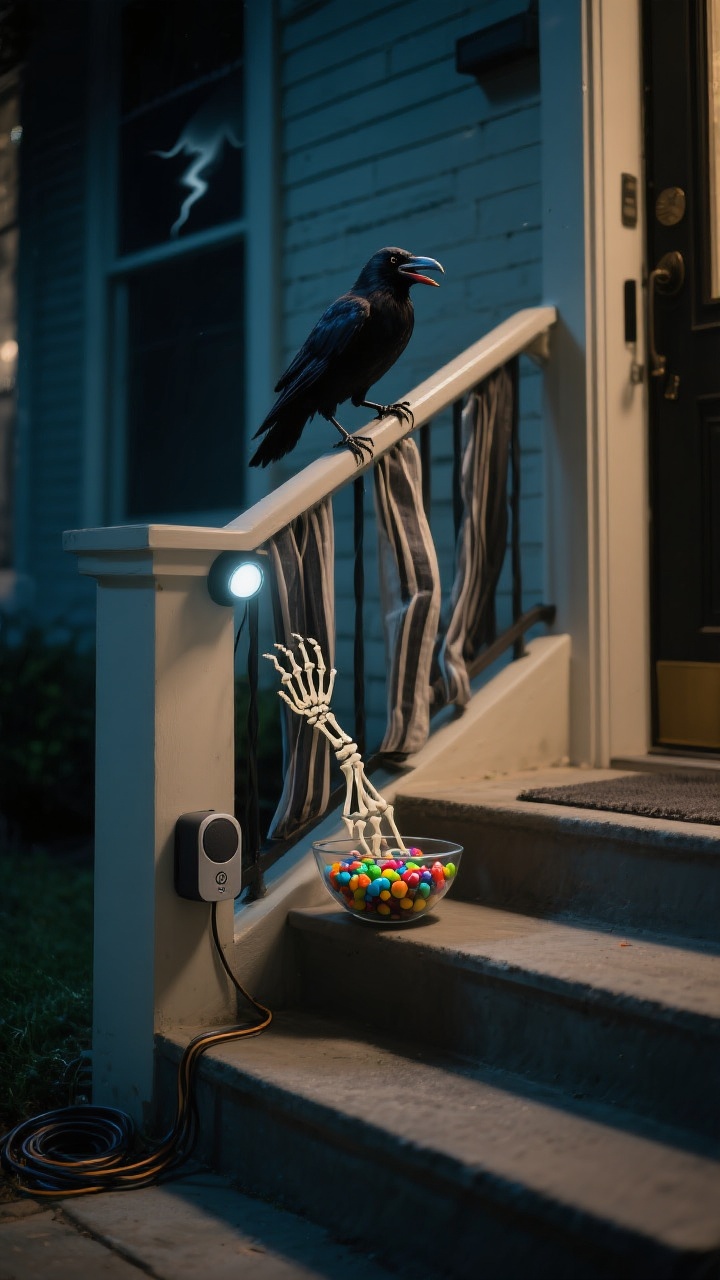
Visuals grab attention, but sound and motion seal the deal. A whisper here, a flutter there, and suddenly your yard feels alive. Keep it classy, not chaotic—no one needs a jump-scare every 3 seconds.
What To Add
- Motion-activated props: A crow that caws or a skeletal hand that twitches near the candy bowl? Chef’s kiss.
- Wind chimes and rustling: Hide chimes or strips of fabric to catch the breeze for unsettling ambience.
- Ambient soundtrack: Low-volume thunder, distant howls, or creaking boards from a tucked-away Bluetooth speaker.
Placement Tips
- Trigger zones near the gate, pathway bends, and the front step are most effective.
- Balance surprise with safety: avoid startling people on stairs. Kind of important.
- Test at night and adjust volumes so it’s eerie, not obnoxious to neighbors.
Quick Safety + Weather Checklist
- Use outdoor-rated cords, lights, and extension boxes. Tape or cover cords along walkways.
- Stake everything—webs, signs, props—especially if you’re in a windy area.
- Opt for LED candles instead of open flame. Less risk, same glow.
Putting It All Together
Pick a theme—Haunted Manor, Witchy Woods, or Classic Pumpkin Patch—and let it guide your choices. Then layer: big focal points (graveyard or giant web), supporting cast (windows, trees), and finishing touches (sound, fog, lanterns). Keep pathways clear and lighting intentional, and boom—you’ve got a yard that looks curated, not cluttered.
Now cue the crows, set those timers, and prep the candy. Your house is officially the Halloween destination this year. Don’t be surprised if the neighbors ask for your “sources”—share if you want, or keep a few secrets for next October. Happy haunting!