
Your mailbox is basically the first handshake your home gives the neighborhood. So why not dress it up for the holidays and let it say, “Yep, we’ve got hot cocoa and our life together.” These 5 Christmas mailbox decoration ideas are easy, eye-catching, and surprisingly durable—even when winter decides to be extra. Let’s make your curb the star of the street.
1. Evergreen Glam: The Classic Garland Glow-Up
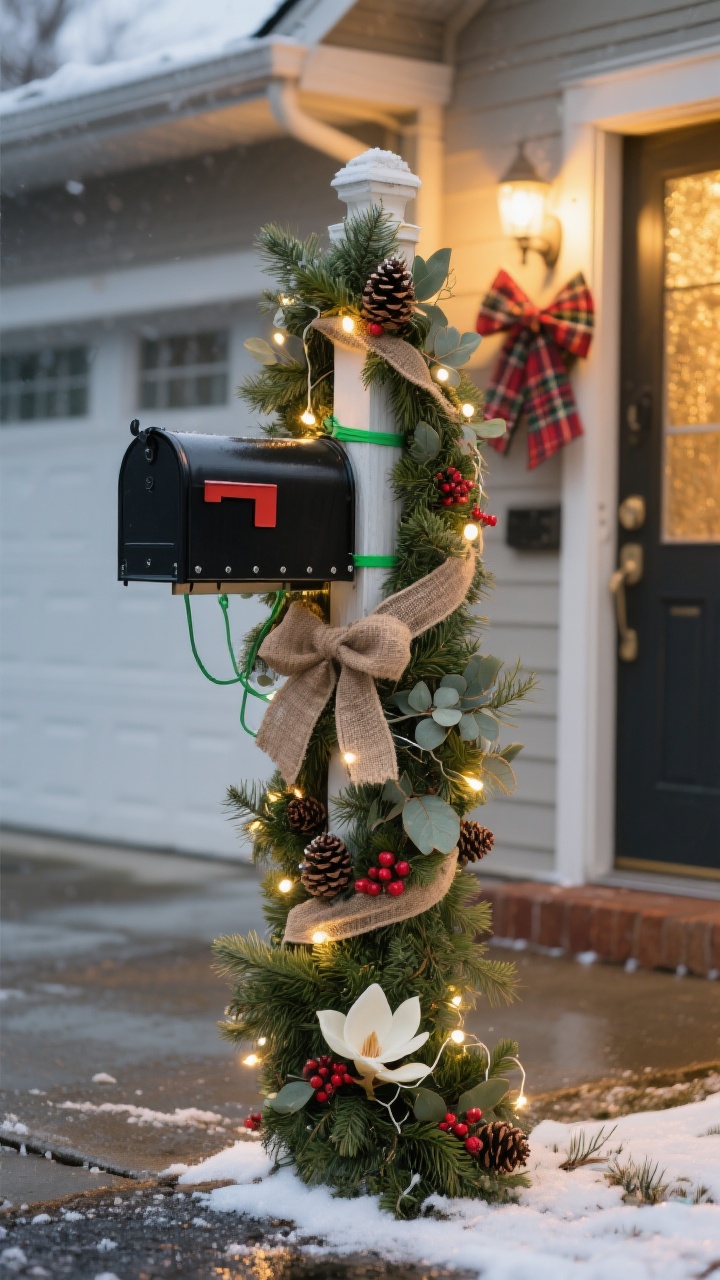
If you want timeless and cozy, you can’t beat a lush garland wrapping your mailbox post. Think of it as the little black dress of holiday decor—simple, elegant, and always flattering. The trick? Layer textures and light for that “did a designer do this?” effect.
How to Build It
- Base Garland: Start with a thick, wired evergreen garland (9–12 feet). Faux is fine; it holds up in weather and doesn’t shed.
- Wrap & Secure: Spiral it around the post and across the mailbox arm. Use green zip ties or floral wire every 8–10 inches.
- Add Lights: Tuck in battery-operated warm-white mini lights with a timer (trust me, the timer saves your sanity).
- Layer Texture: Mix in cedar sprigs, eucalyptus, or magnolia leaves for depth. A few red berry picks = instant pop.
Style It Your Way
- Modern Minimal: Just greens + lights + a black velvet bow.
- Rustic Cozy: Add pinecones, burlap ribbon, and a tartan bow.
- Glam: Metallic ornaments (shatterproof!), gold ribbon, and a few glittered picks.
Pro tip: Keep embellishments on the sides/back so the door and flag still move. Safety but make it cute.
2. Bow-tanical Statement: Big Bow, Bigger Personality

When in doubt, go bow or go home. A show-stopping bow turns even a plain post into holiday art. It’s dramatic without being high-maintenance—like your favorite oversized scarf, but for your mailbox.
The Perfect Bow Recipe
- Ribbon Matters: Use 2.5–4-inch wired ribbon so it holds its shape.
- Go Oversized: Aim for a 10–14-inch bow for curb appeal. Bigger reads better from the street.
- Double Up: Layer two ribbons (e.g., plaid + velvet) for a boutique look.
- Tail Drama: Cut tails 18–24 inches and use a V-cut to finish.
Make It Stick
- Mounting: Use a Velcro strap or zip ties around the post. Add a thin bead of outdoor-safe removable adhesive if it slides.
- Windproofing: Place the bow slightly below the box to shield it from gusts. Fluff after storms—like hair, it needs a touch-up.
FYI: A bow pairs perfectly with minimal greens or even solo if you’re going for chic simplicity.
3. Ornament Cluster Cascade: The Color-Burst Moment
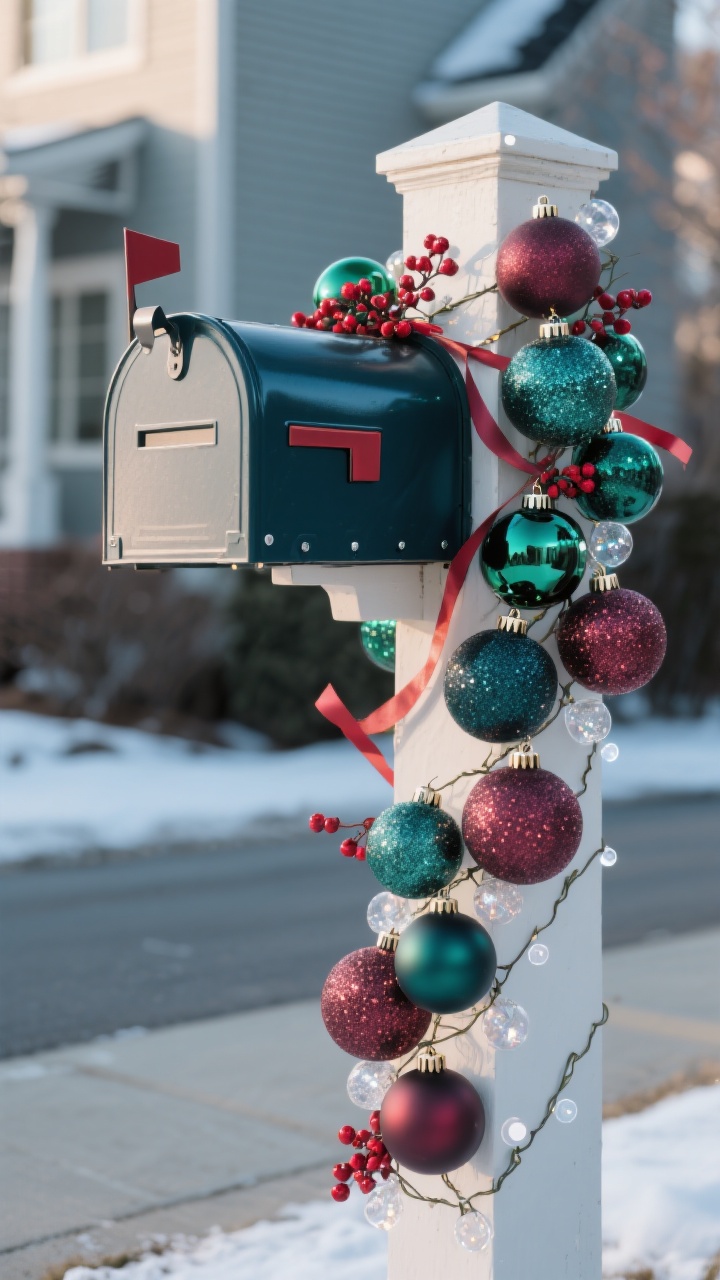
Ready to go bold? Create a cascade of ornaments that drapes along the post like a luxe necklace. It’s festive, affordable, and wildly customizable—choose your palette and go to town.
Build The Cluster
- Shatterproof Ornaments: Mix sizes (40–70mm) for balance. Matte + glossy + glitter = chef’s kiss.
- Color Story: Classic red/green, Nordic neutrals (cream, taupe, champagne), or moody jewel tones (emerald, navy, burgundy).
- Assembly: Thread ornaments onto floral wire or a thin garland base in clusters of 5–7. Secure each cluster to the post.
- Filler: Add ribbon streamers and berry picks between clusters for movement.
Smart Placement
- Start High: Anchor near the box, then drape diagonally downward.
- Balance: Keep the flag side clear or use low-profile elements.
- Weather-Proof: Dot a tiny bit of clear outdoor adhesive on ornament caps so they don’t pop off in cold snaps.
Bold move: Match your ornament colors to your front door wreath for a pulled-together, magazine-cover vibe.
4. Cozy Cabin Wrap: Plaid, Pinecones, And Nordic Magic
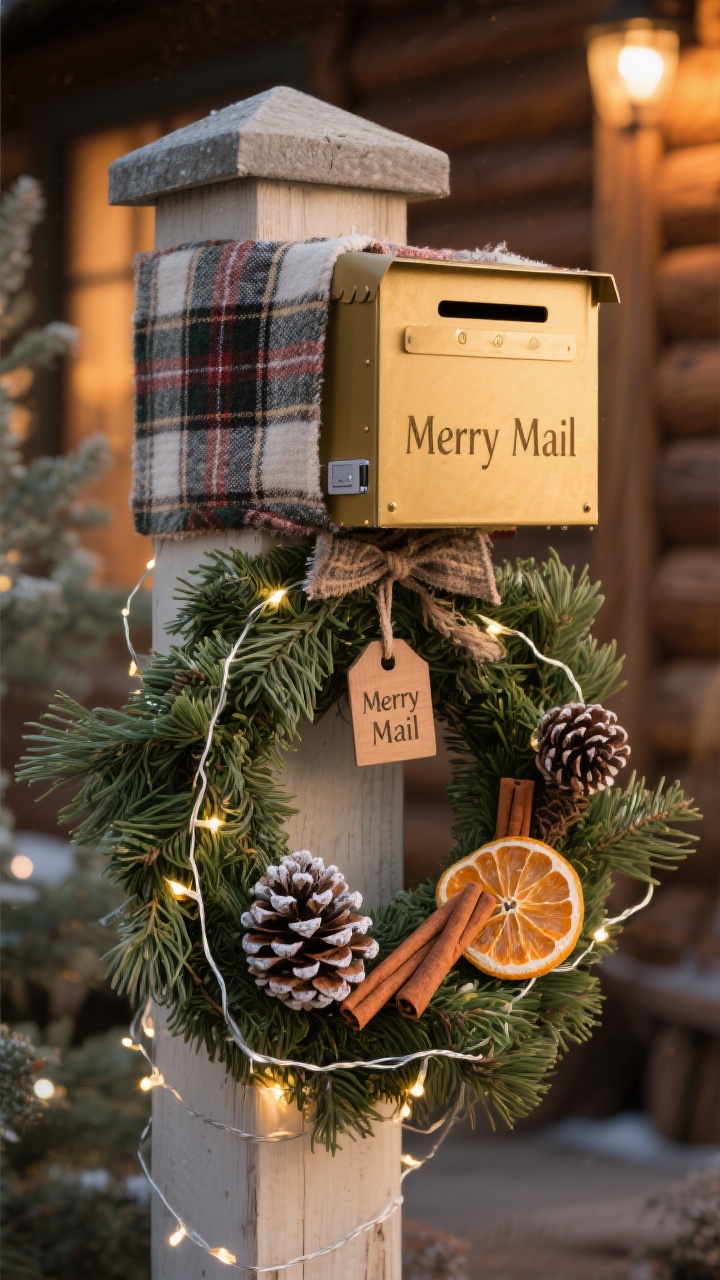
Think winter lodge meets your front yard. This look leans into textiles and natural elements for that “I smell cinnamon” energy. It’s warm, welcoming, and super forgiving if you’re not a perfectionist.
The Layered Look
- Textile Base: Wrap the post with plaid flannel ribbon or a narrow scarf. Secure with double-sided outdoor tape.
- Greenery Collar: Create a thick mini-wreath around the post under the box using cedar or faux garland.
- Natural Accents: Wire on pinecones, cinnamon sticks, and dried orange slices.
- Statement Tag: Add a small wooden sign: “Merry Mail,” “Letters to Santa,” or your family name.
Soft Lighting
- Fairy Light Threads: Weave in micro-LEDs for a subtle glow (warm white looks best with rustic textures).
- Battery Pack: Tuck behind the post collar and secure with zip ties.
IMO: A little asymmetry makes this look more natural. Don’t try to make it perfect—let the textures do their thing.
5. Winter Woodland Scene: Mini Vignette That Tells A Story
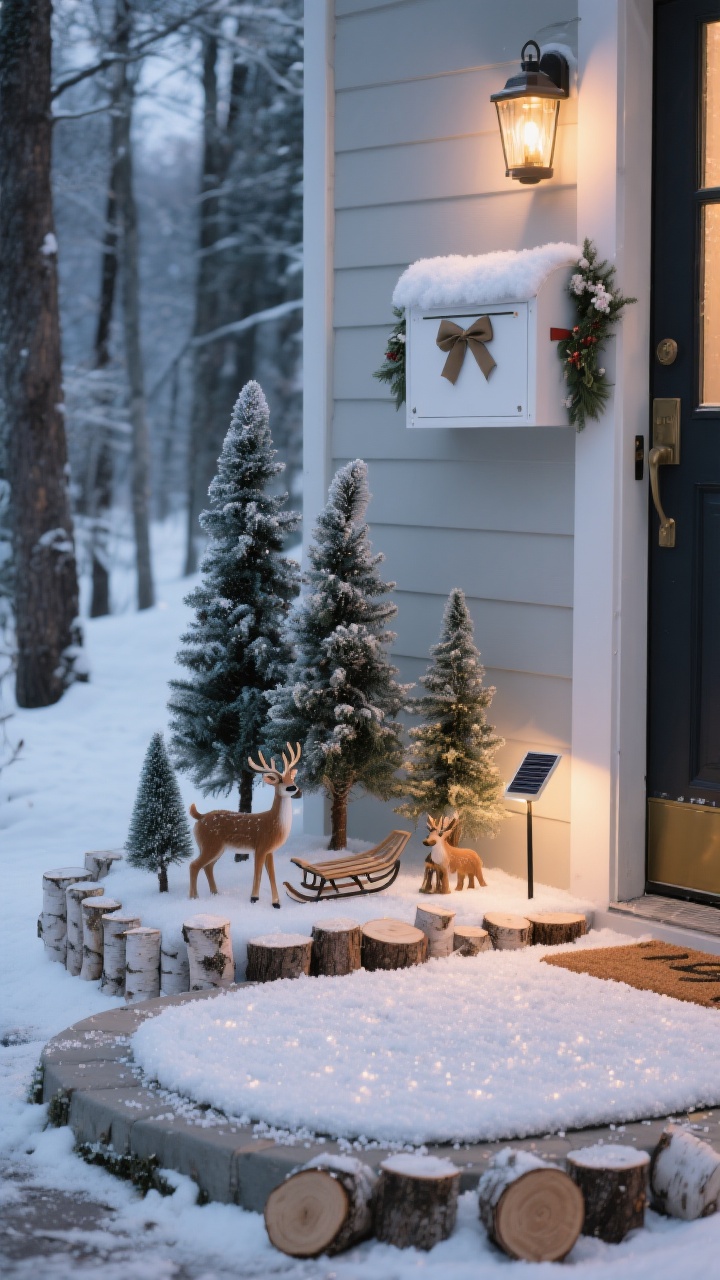
Want something the kids (and all the dog walkers) will love? Build a tiny winter scene at the base of your mailbox. It’s like a snow globe, but make it curbside.
Create The Base
- Define The Zone: Lay down a half-circle doormat or a thin outdoor-safe board painted white.
- Snow Layer: Use weather-resistant faux snow blanket or white felt. Add a light sprinkle of Epsom salt for frosty sparkle.
- Edge It: Border with small logs, birch slices, or stones to keep everything in place.
Build The Story
- Mini Trees: Cluster 3–5 bottlebrush trees in staggered heights.
- Critters Or Figurines: Deer, foxes, or a tiny sled—keep it charming, not cluttered.
- Mailbox Tie-In: Add a small garland and bow up top to echo the colors below.
- Lantern Glow: Place a small LED lantern or solar stake light for nighttime magic.
Make It Weather-Proof
- Anchor: Use exterior Velcro or discreet screws for the board if wind is an issue.
- Drainage: Leave gaps at the back so water can escape after rain or snow melt.
- Quick Cleanup: Store smaller pieces in a labeled bin—future-you will thank present-you.
FYI: If you shovel often, keep the vignette slightly offset from the main path so it doesn’t become collateral damage.
Quick Safety + HOA Notes
- Postal Access: Keep the mailbox door, slot, and flag completely clear. No décor over the opening.
- Visibility: Don’t block house numbers or sightlines for drivers.
- Materials: Choose outdoor-safe, non-glass, flame-free items. Shatterproof ornaments only.
- Rules Check: If you have an HOA or shared mailbox cluster, confirm what’s allowed before going full Santa’s workshop.
Care And Maintenance (So It Stays Cute)
- Weekly Fluff: Re-fluff bows and shake off snow accumulation.
- Zip Tie Audit: Tighten or replace if they loosen in freeze/thaw cycles.
- Light Check: Use timer lights and swap batteries mid-season for consistent glow.
Budget + Sustainability Tips
- Shop Smart: Dollar store for ornaments, craft store for picks, hardware store for ties and wire.
- Reuse Base Elements: Invest once in quality greens and lights; change only accents each year.
- Forage: Pinecones and branches from your yard = free, chic, and eco-friendly.
There you go—five festive ways to turn your mailbox into a holiday mood board. Start with one idea, mix in pieces from another, and make it yours. Your mail carrier will appreciate the glow-up, and your curb will absolutely sleigh. Now go spread some cheer—one package delivery at a time.