
Ready to make your Christmas tree the star of the entire holiday season? Let’s go bold with red Christmas magic—the kind that looks chic from the street and jaw-dropping up close. Whether you’re into classic cranberry, glossy lacquer, or moody burgundy, these six ideas will turn your tree into a festive masterpiece. No boring basics here—just smart styling and a few pro tricks so your tree looks curated, not chaotic.
1. Paint the Tree With Ribbons (Yes, Literally)
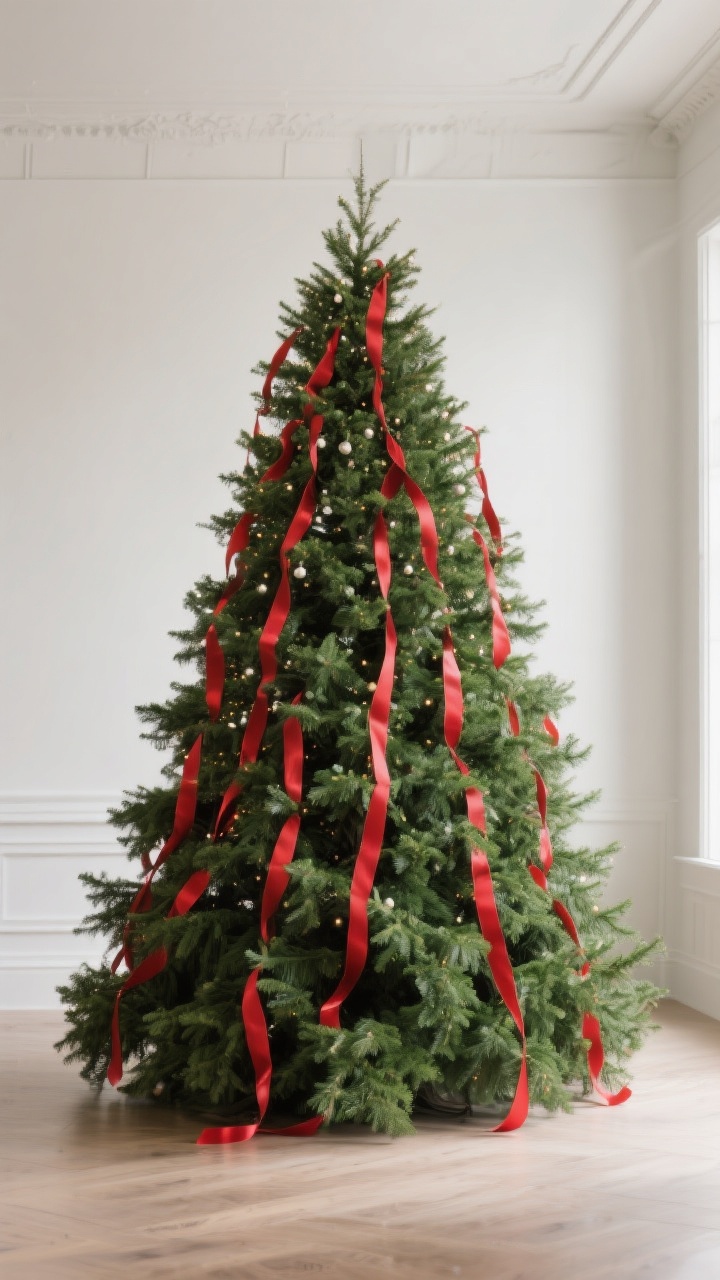
Ribbons are the quickest way to make any tree look expensive. The secret? Don’t hang them like ornaments—weave them. Think of them as garlands that flow from top to bottom in soft cascades.
How to Get That Designer Ribbon Look
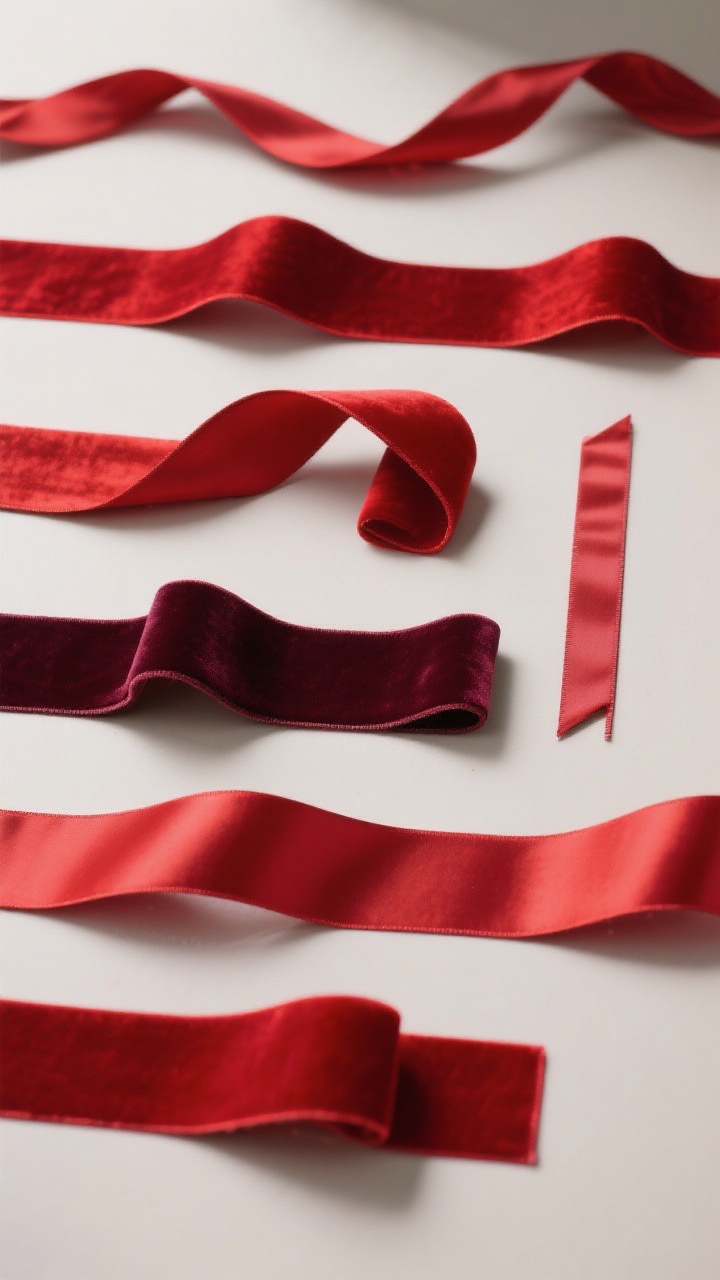
- Mix widths: Use a wide 2.5–4″ satin or velvet ribbon plus a slimmer 1–1.5″ one. It adds depth fast.
- Two tones of red: Try cherry red with deep burgundy for dimension. Add a gold or champagne accent ribbon if you want glam.
- Start at the top: Tuck the ribbon into branches, then let it billow and re-tuck every 10–12 inches. Don’t wrap like a spiral—you’ll lose the luxe effect.
- Use floral wire: Secure ends inside the tree so it looks effortless (it’s not, but they don’t need to know).
Pro tip: If your ribbon isn’t wired, lightly twist it as you tuck. It creates soft loops that look custom and won’t collapse by week two.
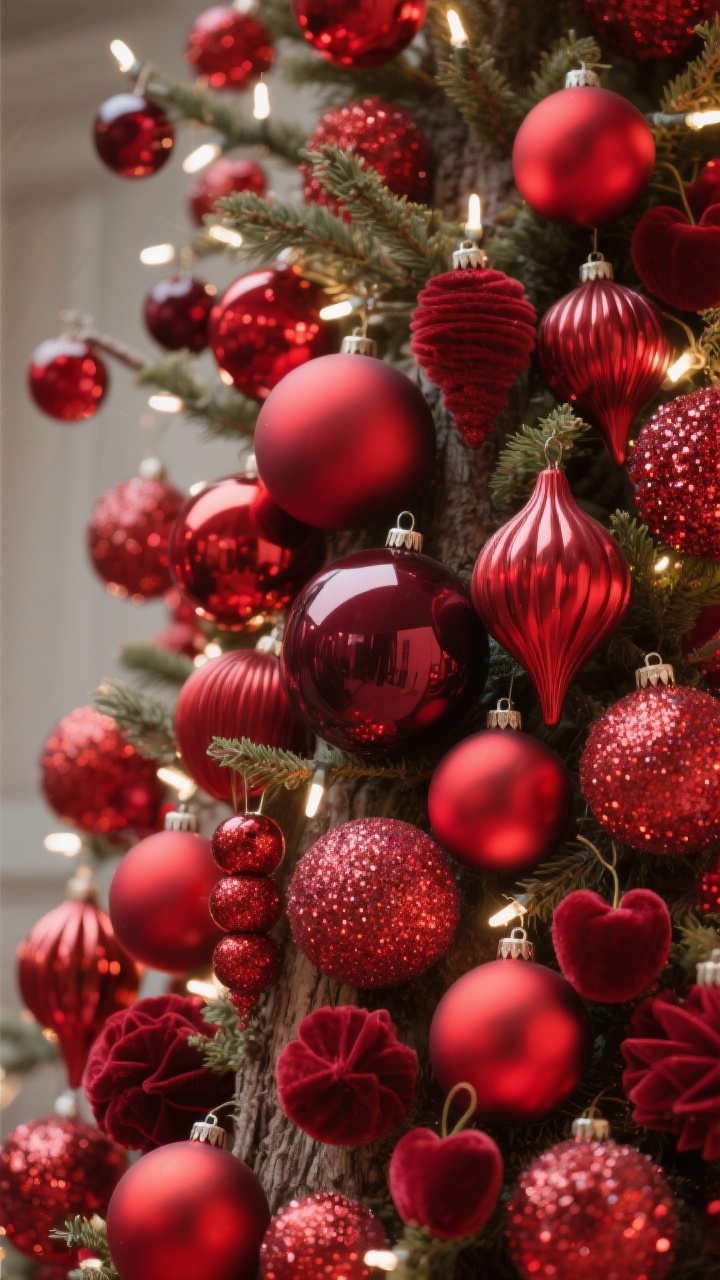
2. Go Monochrome With Mixed Finishes
Want your tree to feel ultra curated? Stick to all red ornaments but vary the finish: matte, gloss, metallic, glitter, velvet, even flocked. Monochrome is sleek; mixed finishes keep it from feeling flat.
The Mix That Never Fails
- 60% matte + 30% gloss + 10% sparkle: It keeps things elegant with just enough shine to catch the lights.
- Front-load large ornaments: Hang big ones deeper in the tree to add depth, then smaller ones at the tips.
- Burgundy as your shadow color: Tuck darker red ornaments inside to create a subtle gradient.
- Repeat shapes: Choose 2–3 shapes (round, onion, finial) and echo them throughout so it looks intentional.
FYI: If your tree has warm lights, choose warmer reds (cranberry, merlot). If you’ve got cool LEDs, try cherry red with a tiny hint of ruby to keep things crisp.
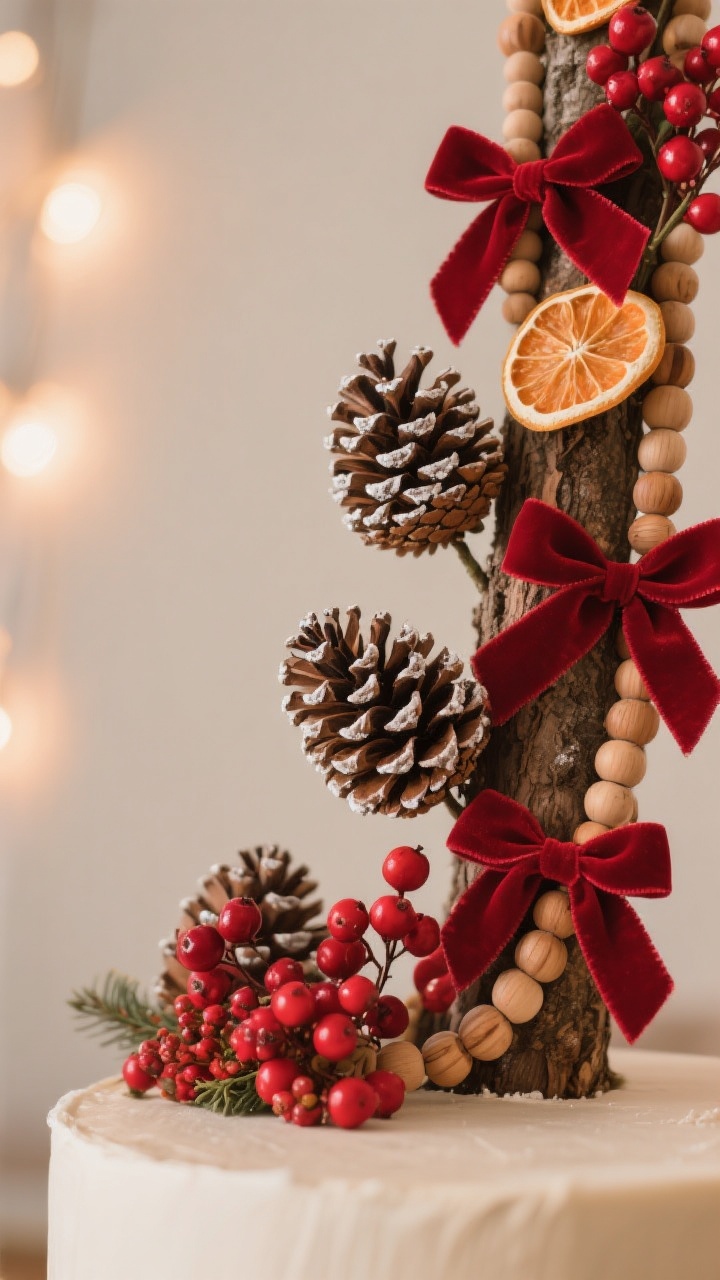
3. Layer Natural Elements for Cozy Luxe
Want that “oh, did a decorator do this?” vibe? Layer in natural textures with your red. Think dried oranges, cinnamon bundles, pinecones, berries, and wood bead garlands. It’s festive without leaning cheesy.
Nature + Red = Cozy Perfection
- Berry picks: Cluster red berry stems in odd numbers and tuck them in at angles for movement.
- Pinecones: Leave them unpainted or dust the tips with white for a snowy effect. Add a red velvet bow to a few.
- Dried citrus: Tie orange slices with thin red velvet ribbon. It smells amazing and looks artisanal.
- Wood beads + red ribbon: Thread a thin red satin ribbon through a wood bead garland here and there for a subtle pop.
Pro tip: Use floral picks in clusters at the base of your topper and at the middle third of the tree to create focal points that guide the eye downward.
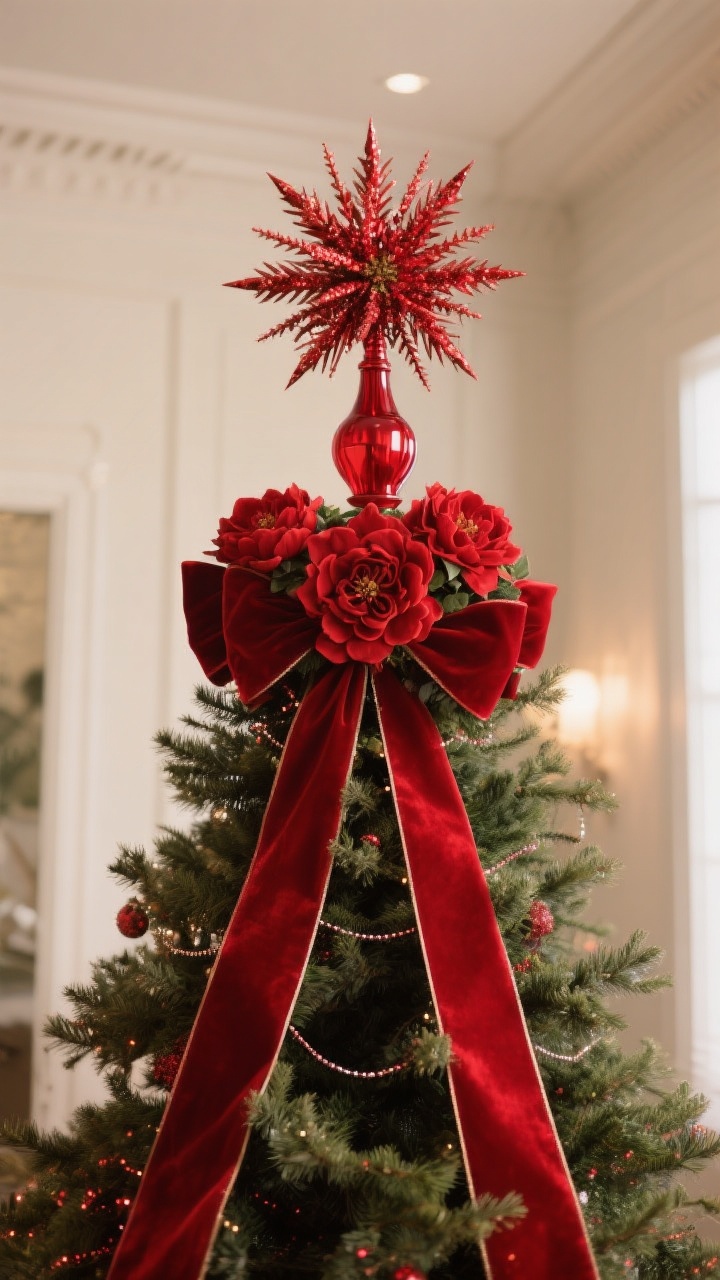
4. Statement Topper, Minimal Drama Everywhere Else
Let’s talk toppers. A bold, red statement topper can carry the entire tree. If you go big up top, keep the mid-zone simplified so the silhouette stays clean.
Topper Ideas That Actually Look High-End
- Velvet bow cascade: Oversized red velvet bow with long tails that trail down the tree 2–3 feet. Instant drama, zero glitter mess.
- Starburst spray: Use red metallic sprays or glass finial stems arranged like a firework. Anchor with floral wire.
- Classic finial in lacquer red: Tall, elegant, and perfect if your ceiling height can handle it.
- Floral crown: A ring of red faux peonies or poinsettias around the top third. Keep it tight and lush, not wild.
Keep the balance: If your topper is lush or tall, scale back on the ornaments in the top quarter of the tree. Let that hero moment breathe.
5. Create a Red Story With Zones and Repeats
Ever wonder why some trees look “finished”? It’s the rhythm and repeat. Group like items in subtle zones and repeat them in a triangle pattern around the tree so the eye flows naturally.
Design Like a Stylist
- Triangle placement: Place three of the same ornament at top, mid, and lower areas forming a triangle. Repeat with 3–4 styles.
- Color zoning: Use brighter reds higher, deeper reds and textures lower. It creates grounding and visual weight.
- Odd numbers win: Decorate in 3s and 5s (sprays, bows, clusters). Your brain likes it, trust me.
- Cluster power: Group 2–3 smaller red ornaments together with a mini bow for instant impact on sparser branches.
IMO, this is where good trees become great. You’re not just hanging—you’re composing.
6. Finish With Luxe Bases and Layered Lighting
Don’t stop at eye level. The base and lighting can make or break a red-forward tree. Warm up the glow, then ground the look with a gorgeous skirt or collar.
Light It Like a Pro
- Two-tone lights: Mix warm white with a sprinkling of soft red micro-LEDs for a subtle blush effect.
- Layer depth: Push one strand deep into the trunk, then another closer to the branch tips. Hello, dimension.
- Twinkle sparingly: Use 1 twinkle strand for every 3 steady strands. More than that and it’s disco, not holiday.
Ground the Look
- Tree collar in lacquer red: Modern, sleek, and pet-proof. Pair with matte ornaments for contrast.
- Chunky knit skirt: Cream or taupe with red accents keeps things cozy, not candy cane.
- Gift styling: Wrap presents in kraft paper with red velvet ribbon, or red paper with black or plaid ribbon for balance.
Pro tip: Add one unexpected material at the base—like a red leather catchall tray for remotes or a ceramic bowl of ornaments—to tie the room into the tree. It’s the quiet detail that makes everything feel intentional.
Quick Shopping Checklist
- Ribbons: 2–3 rolls each of wide velvet/satin in two reds + 1 accent.
- Ornaments: 60% matte, 30% gloss, 10% specialty (glitter, velvet, glass).
- Picks and sprays: Berries, evergreens, metallic red accents.
- Topper components: Bow, finial, or floral picks to build a custom piece.
- Lighting: Steady warm white + one strand red micro-LEDs.
- Base: Red collar or neutral knit skirt; coordinating gift wrap.
FYI: If your space skews modern, lean into lacquer, chrome, and crisp cherry red. If it’s more traditional, velvet, burgundy, and gold details will feel right at home.
Troubleshooting Common Red Tree Issues
- Looks too busy? Pull back on patterns and glitter. Keep the sparkle to 10–15%.
- Feels flat? Add texture: velvet ribbon, matte ornaments, and berry picks for dimension.
- Top looks heavy? Add a few larger ornaments or sprays in the top third to balance or trim the topper.
- Red clashes with your room? Introduce a buffer color like champagne, black, or natural wood to bridge it.
Bottom line: a red Christmas tree can be bold, chic, and ridiculously photogenic when you mix textures, control shine, and let one big moment (hello, topper) steal the show. Pick two or three ideas above, layer slowly, and step back often. You’ve got this—and your tree is about to be the main character.